With an Automatic Material System (AMS) installed, it is possible to have multiple colours or filaments within the same print job.
Flushing Volume
This determines how much filament you need to flush out when swapping materials. In Bambu Studio it is represented as a table (“to” → “from”).
Set this number higher to ensure that previous filament has been flushed out (more relevant if colour difference is obvious; or material has to be pure) at the expense of more wastage.
Colouring Mechanics
In Bambu Studio, colour only colours the surface of the 3D model. The inner material of the part is set by default to “Filament 1” of the AMS.
Tip
To not accidentally print the internals with a different filament, check the resulting prime tower. It should only contain colours that you expect.
Bambu StudioColouring Tools
Here’s a high-level explanation of the different methods to colour parts in Bambu Studio:
| Tool | Description |
|---|---|
| Height Adjustment | Select colours by height |
| Circle | Apply colours free-from on a given circle area |
| Sphere | Similar to the Circle tool, but applies to all surfaces within the sphere’s volume |
| Fill | Intelligently detects surface edges and fills in with the colour of choice1 |
| Triangle | Select surfaces by polygons |
| Gap Fill | Fill in gaps with colours from either side |
Multi-print friendly designs
Types of colour change
There are two types of colour/filament changes.
| Type | Description |
|---|---|
| Inter-layer change | Different colours at different layers, but the same colour within a layer. |
| Intra-layer change | Different colours within a layer. |
The latter is extremely costly (see below).
Tradeoffs
While multi-colour prints lead to much more interesting results, it comes with some significant tradeoffs. Two main tradeoffs is that multi-colour prints are:
- slower, as different filaments have to be loaded and unloaded between colours. This probably becomes worse with multi-material prints where the nozzle temperature has to also change (more significant wear and tear)
- wasteful, filaments have to be purged and primed from the nozzle for every swap
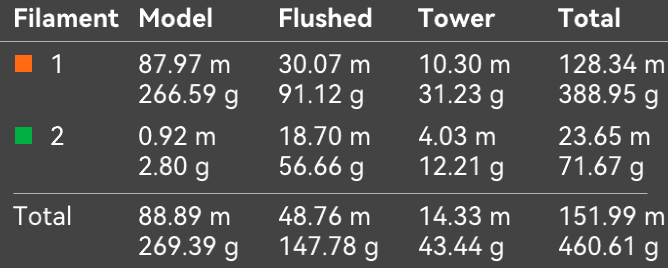
Prints with different colours in the same are very wasteful!
It is not uncommon for prints with different colours between layers to have more wastage than the final product itself 😱 (see example of the green filament in the picture below).
The estimated consumption can be previewed on a table as follows:

Techniques to minimise wastage
Acknowledging that we are working with plastic, ideally we want to minimise wastage from a cost and environmental perspective.
A few ways include:
- minimise the number of filament swaps. This can be done by only changing colours between layers or by using the Height Adjustment tool. Reorienting your print may also be required.
- amortize the wastage by printing many more copies in the same job. You don’t reduce the absolute amount of wastage, but the relative proportion of it.